Documentation
Welcome to the OPAL documentation — the reference guide for installing, configuring, and using OPAL, the O3DE Project Asset Launcher.
If you’re brand new: start with Getting Started.
If you just want a feature rundown: see Features.
If something’s broken: jump to Support below.
How this is organized
Each major area of OPAL has a root page that orients you, plus categorical subpages that go deep on the specific tasks in that area. Start at a root page and drill down as needed.
Sections
Install OPAL, run the first-time wizard, install your first engine, and launch your first project — end to end.
Install O3DE from the launcher, manage installed engines, build from source, and prune what you don’t need.
Create, import, build, run, and export projects. Status states, run states, and missing-engine recovery.
Browse the Asset Library, configure gems per project, and manage repositories, local gems, and watch folders.
Download and build queue controls: pause/resume, reorder, parallelism, speed limits, and schedule windows.
The unified log viewer — where OPAL gathers every relevant O3DE log for debugging builds, launches, and asset processing.
Every configurable option in OPAL, grouped by category, with the defaults called out.
Common symptoms, fixes, and recovery procedures.
Short answers to the questions we get most often.
Release notes for OPAL.
Licence, EULA, privacy, branding, and press.
Support
Join Discord: Real-time help and community — https://discord.gg/vhUPep5ckf
Send a message: Contact form for bug reports, feature requests, licensing, media, or enterprise.
Email: support@opallauncher.com
Follow the project
1 - Getting Started
Install OPAL, run the setup wizard, install an engine, and launch your first project.
This guide takes you from “I don’t have OPAL yet” to “I’m looking at the O3DE Editor with my project open.” No prior O3DE knowledge required — but if you’ve used Unity Hub or the stock O3DE Project Manager, the flow will feel familiar.
1. Install OPAL
Head to the Download page and grab the build for your platform. Run the installer (Windows/macOS) or launch the AppImage (Linux).
2. Run the setup wizard

On first launch, OPAL runs a short onboarding wizard: Welcome → Usage Statistics → Build Tools → Libraries → Install Locations → Done.
The Usage Statistics step is where OPAL asks whether it may collect anonymous usage data. The box starts unticked and clicking straight past it leaves the feature off — see Privacy.
Dependencies
The wizard detects the build tools you already have — CMake, a build system (Ninja / Visual Studio / Xcode), and compilers — and offers the exact install command for anything missing, tailored to your platform’s package manager. You can re-run it any time from Settings.

Installed a New Dependency?
If you installed new tools, like CMAKE, you will need to restart your computer to be able to build your projects successfully.Script-Only
Not planning to compile C++? Turn on Script-Only mode in the bottom of the wizard’s “Build Targets” page (or later in Settings) and OPAL skips source-build tooling entirely.

To know more, see O3DE Script-Only Projects in the O3DE Documentation.
Default Folders

The default paths that O3DE engine and Opal use to download and detect Engines, Projects, Gems, Templates, and more. Usually fine to leave as is, but if you’d prefer to store your default files somewhere specific, change the location of these folders.
3. Install your first engine

Open the Engines page and click Download Engines. OPAL reads O3DE’s release metadata and lists official builds for your platform, newest first (a Latest badge marks the current release).
- Latest release — recommended for new projects.
- Older release — pick any prior version from the list.
- Pre-release — enable “Show pre-releases” to install a
development or stabilization branch build. - Source build — install the engine as source and let OPAL build it (hidden in Script-Only mode).
Pick one. OPAL tracks the work in the Downloads queue (and the Builds queue for source engines). You can keep using the rest of the app while it runs.
Already have an engine on disk? Use Add Engine on the Engines page to register it instead.
4. Create or import a project
Once an engine is installed, go to the Projects page.
Create a new project

Click New Project and fill in:
- Name — validated as you type (starts with a letter; letters, numbers,
_, -; up to 64 characters). - Location — the parent folder for the project.
- Engine — defaults to your default engine; override if needed.
- Template — OPAL preselects
DefaultProject; pick another if you like.
Hit Create. OPAL writes project.json, registers the project, and adds it to the list.
Or import an existing project
Click Import and point at a folder containing a valid project.json. OPAL reads the manifest, resolves the engine, and adds the project without modifying it.
5. Build, then launch
Find the project in your list and check its status badge:
| Badge | Meaning | What to do |
|---|
| Not Built | Never configured/built | Click Build, then Launch |
| Needs Build | Changed since last build | Click Build to refresh |
| Built | Build is current | Click Launch to open the Editor |
| Build Failed | Last build errored | Open Logs to see why |
For a fresh project you’ll see Not Built. Click Build — OPAL queues the CMake configure and compile (the first build takes a while; that’s O3DE compiling your project). When it flips to Built, click Launch. The card walks through Launching → Processing Assets → Running as the Editor opens with your project loaded.
6. Next steps
2 - FAQ
Short answers to common questions.
Short answers to the questions we get most. Missing one? Ask us.
General
What is OPAL?
OPAL — O3DE Project Asset Launcher — is a third-party desktop launcher for the Open 3D Engine. It manages engine installations, projects, gems, downloads, and builds in a single app, with a much richer workflow and UX than the stock O3DE Project Manager.
Is OPAL affiliated with the O3DE Foundation?
No. OPAL is an independent project by Genome Studios. It’s built for O3DE, and O3DE users, but it’s not an official O3DE Foundation product.
What does OPAL cost?
OPAL is free to download and use. See the Licence Notice page for terms.
Windows, macOS, and Linux.
Getting help
Something’s broken — what do I do?
- Check Troubleshooting
- Ask on Discord
- Contact us directly
How do I request a feature?
Bring it up on Discord or via the contact form. Most features start as conversations.
Install & setup
Do I need to install O3DE before OPAL?
No — that’s the whole point. OPAL installs O3DE for you. Download OPAL, open it, pick an engine version, and OPAL handles the download, install, and registration.
What does the first-run wizard do?
It detects your build tools (CMake, a build system, compilers) and offers the exact install command for anything missing, tailored to your platform. If you’re not compiling C++, you can enable Script-Only mode and skip source-build tooling. You can re-run the wizard any time from Settings.
Can OPAL coexist with the stock O3DE Project Manager?
Yes. They share the same project.json format and the same O3DE manifest. Projects and engines registered by one are visible to the other.
However, some granular data, and special settings and features like Watch Folders, do not work in original Project Manager. It is suggested to use Opal in place of the original Project Manager to ensure consistent and feature rich usage. Opal can do everything Project Manager does and more.
Can I import projects I already have?
Yes. Projects → Import → point at the project folder. OPAL reads the existing project.json and adds it without modifying anything.
Engines
Can I install multiple O3DE versions?
Yes. Every engine lives in its own folder and is registered independently. Projects pin to specific versions, and you can keep as many installed side by side as you want.
Can I install older versions and pre-releases?
Yes. The Engine Downloads list includes prior releases, and a Show pre-releases option surfaces development and stabilization branch builds.
Can I add my own engine download source?
Yes. Add a custom engine source by pointing OPAL at a JSON release manifest and mapping its fields. Your builds then appear alongside the official releases. See Install engines.
Can I build O3DE from source?
Yes. Install an engine as source and OPAL runs the build through the Builds queue. Prebuilt engines don’t offer a build action (there’s nothing to compile). See Source builds.
What happens if I delete an engine folder manually?
OPAL detects the mismatch and flags affected projects with a missing-engine state, offering to add, register, or pin an engine. Removing engines through OPAL sends them to the recycle bin instead, so it’s recoverable.
Projects
Yes. OPAL writes standard project.json manifests. The O3DE Editor, the o3de CLI, and the stock Project Manager all treat OPAL projects as normal O3DE projects.
Can I use different build settings per project?
Yes. A project can set its own build type (Debug / Profile / Release), its own build targets, a build tool override, and its own launch arguments — anything left alone follows the global setting. See Project settings. CMake flags and build thread count are global, in Build Tools settings.
Can I build without compiling everything?
Yes. The build button is a split button: Configure runs only the CMake configure step, and Clean Build deletes the build folder and starts from scratch. You can also narrow a build to specific targets in Project settings. See Build modes.
Can I export a finished project?
Yes. Export Project on a project’s action menu packages a standalone release build — launcher targets, bundled level assets, and an optional archive — using O3DE’s own export pipeline. See Export.
Gems & assets
Where do gems come from?
From any repositories you add (by URL), local gem folders, watch folders, and the gems bundled with your engines. See Repositories & sources.
How do I enable a gem for a project?
Open the project’s gem configuration and toggle gems on or off. OPAL keeps project.json and the CMake gem list in sync, and won’t let you disable a gem another active gem requires. See Project gems.
How do I search for a gem?
Free-text search plus filter prefixes: author:, tag:, gemType:, compatibleEngines:, downloaded:, hasUpdate:, and updatedBefore: / updatedAfter:. See Asset Library.
Downloads & builds
My download was interrupted — did I lose progress?
No. Downloads are resume-safe. On reconnect or next launch, a download picks up rather than restarting.
Can I pause a build?
Yes, up to a point. The pause checkpoint sits between the configure and compile stages, so a build stops being pausable once CMake has finished configuring and the compiler is running. Cancelling works at any time and also stops the child processes it spawned. See Builds.
How many builds can I run at once?
Configurable (default 1) — O3DE builds are memory-hungry, so 1 is a good default on a laptop. Project exports share that same limit, since they compile launchers through the same toolchain. Downloads have their own independent concurrency and connection limits.
Can I schedule downloads to run overnight?
Yes. Set a download schedule window in Settings. OPAL pauses at the window’s close and resumes at its open; overnight windows are handled correctly.
Privacy
Does OPAL collect telemetry?
Only anonymous usage data, and only if you opt in. The setting ships off — OPAL asks once during first-run onboarding, and you can change your answer any time in Settings -> Analytics. While it’s off, nothing is loaded and nothing is sent.
There is no crash-reporting service, no third-party analytics vendor, and no tracking cookie. What’s collected can’t be traced back to you, is never sold or shared, and your projects and settings never leave your machine. See the Privacy page for the full picture.
Does the website track usage?
Yes, separately from the app. The website counts page views and which downloads and links get used, such as which platform’s installer was picked, so we can see what’s useful. Turning off the app’s telemetry doesn’t change this.
That data is anonymous and collected without cookies: no account, no sign-in, no persistent identifier. It’s gathered by analytics software Genome runs on its own servers, so no third-party analytics provider is involved, and it’s never sold. The Privacy page has the full picture.
3 - O3DE Dev Tools - VSCode Extension
VSCode companion tool for O3DE Engineering.
O3DE Development Tools is a VSCode extension built for daily O3DE programming, and a powerful companion to Opal’s project management. It guides your workspace and toolchain setup, builds and runs your project in one click, gives you C++ and Lua IntelliSense, and debugs Lua against a running O3DE Editor. The Class Creation Wizard scaffolds new components, and opt-in LLM connections let an assistant such as Claude build and run your project for you.
Get it now
Available for:
The dashboard
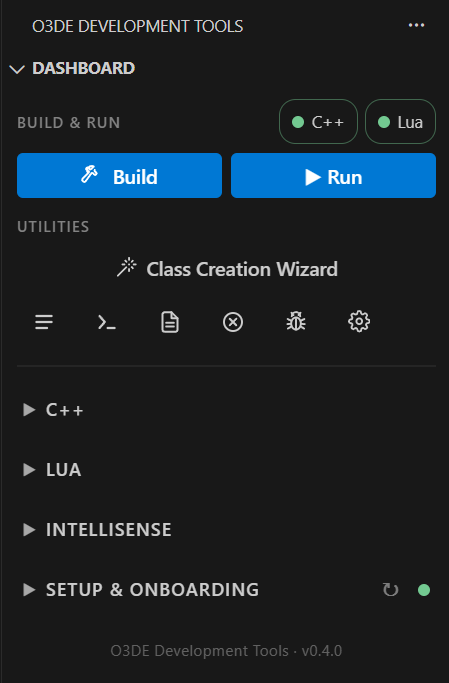
Everything runs from one O3DE Development Tools panel in the activity bar. It opens on a Dashboard: Build and Run up top, a row of utilities beneath, then collapsible C++, Lua, IntelliSense, and Setup & Onboarding sections.
- Build builds the selected targets with CMake. Progress shows in the panel, full output streams to the O3DE Build Output channel, and the button becomes Stop Build while a build runs. Hotkey:
Ctrl+Alt+B. - Run launches the selected run target, the Editor by default. Press it again, or
Ctrl+Alt+R, and it force-quits the app and its child processes, Asset Processor included. Run is unavailable during a build, when binaries are half-written. - The C++ and Lua pills show whether each track is ready.
- Class Creation Wizard opens O3DE’s own component and EBus scaffolding tool, wired to your active engine and project.
- The icon row opens, left to right: the extension’s output channel, a developer terminal,
Editor.log, Error.log, Run in Debug, and the extension’s settings.
Onboarding
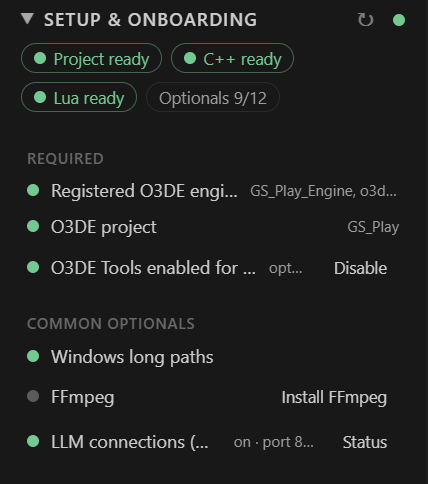
Setup & Onboarding checks everything the tools depend on and offers a one-click fix for what’s missing: install, enable, or configure. A status light and re-scan button sit in the header, beside readiness pills for Project, C++, and Lua, and a count of optionals met.
- Required: a registered O3DE engine, an O3DE project, and O3DE Tools enabled for this project. The extension is opt-in per project. It asks once when you open an O3DE project, and a non-O3DE workspace stays fully dormant.
- Common optionals: Windows long paths, FFmpeg, and LLM connections.
- LLM connections are off by default and set per project. When on, a local MCP endpoint, bound to
127.0.0.1, lets an assistant such as Claude build, run, read structured build results, and read or change build configuration.
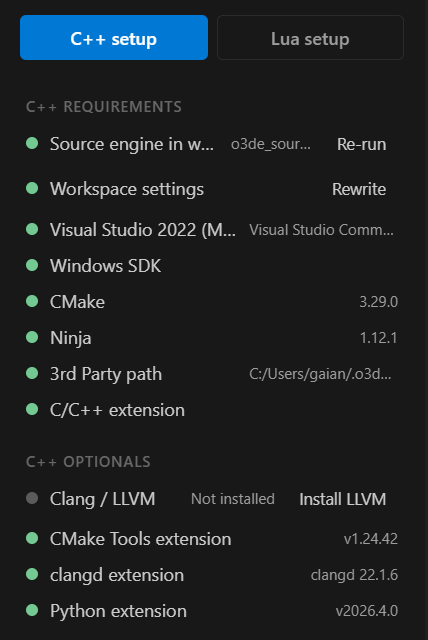
Choose C++ setup or Lua setup to see that track’s checks.
C++ requirements
- Source engine in workspace and Workspace settings run the guided workspace setup: one multi-root workspace holding your project, the engine source, and gems. It generates
.vscode settings, a launch.json (Editor, GameLauncher, Attach, Class Creation Wizard), and O3DE code snippets. Re-run and Rewrite redo them. - The toolchain for your platform: Visual Studio 2022, Windows SDK, CMake, and Ninja on Windows. Clang or GCC, CMake, and Ninja on Linux.
- The 3rd Party path and the C/C++ extension.
C++ optionals: Clang / LLVM, CMake Tools, clangd, and Python. An optional item that’s absent reads Not installed on a neutral dot, never a red fault.
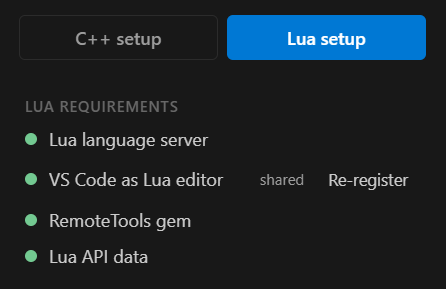
Lua requirements
- Lua language server (
sumneko.lua), which provides completion and hovers. - VS Code as Lua editor, so O3DE’s Open Lua Editor opens scripts here. Re-register repeats the one-time registration.
- The RemoteTools gem, which the debugger connects through.
- Lua API data, the dump of O3DE’s reflected scripting API that IntelliSense and the palette read.
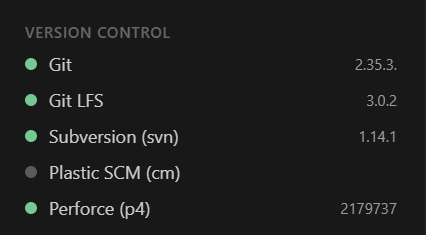
Version Control detects Git, Git LFS, Subversion, Plastic SCM, and Perforce, and shows the installed version of each.
C++
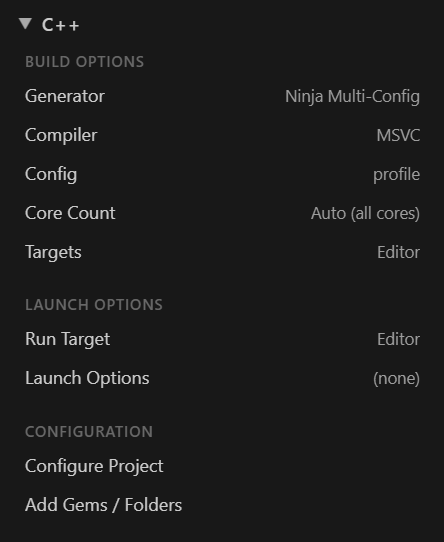
- Build Options: Generator (for example Ninja Multi-Config), Compiler (MSVC or Clang on Windows, Clang or GCC on Linux), Config, Core Count (Auto uses every core), and the Targets to build.
- Launch Options: the Run Target and any launch arguments. The picker offers every executable the project can produce: Editor and GameLauncher first, then other executable CMake targets and tools already built, plus Custom executable… for anything else.
- Configure Project runs the CMake configure, and becomes Stop Configure while it runs.
- Add Gems / Folders adds them to the live workspace, with no reconfigure and no reload.
Run in Debug, the bug icon, launches the selected target under VS Code’s C++ debugger, with the launch configuration generated for you. The C/C++ extension provides that debugger even when clangd provides IntelliSense.
The Advanced view, below the Lua Palette, manages extra CMake cache variables (-D flags) passed to Configure: toggles for LY_RENDERDOC_ENABLED and CMAKE_OBJECT_PATH_MAX, plus any custom flag. Flags are stored per project, and Apply (Reconfigure) pushes them into the CMake cache.
Lua
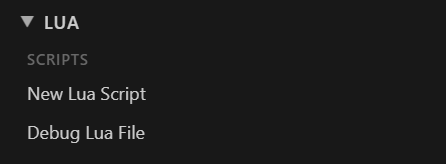
- New Lua Script opens a new, unsaved script from a template. Save it inside your project so the Asset Processor compiles it.
- Debug Lua File starts the debugger for the open script. Start your game, in Editor Game Mode or the GameLauncher, and it connects automatically.
The debugger is a native Debug Adapter for O3DE’s RemoteTools protocol, with no companion gem: breakpoints, stepping, call stack, locals, watch, and edit-value. It needs a non-Release Editor or Launcher build with the RemoteTools gem enabled, which O3DE’s standard project templates do by default. It is localhost only, one target at a time.
Run O3DE: Register VS Code as Lua Editor once and restart the Editor. After that, the Editor’s Tools ▸ Lua Editor and a Script component’s Edit button open scripts in VS Code.
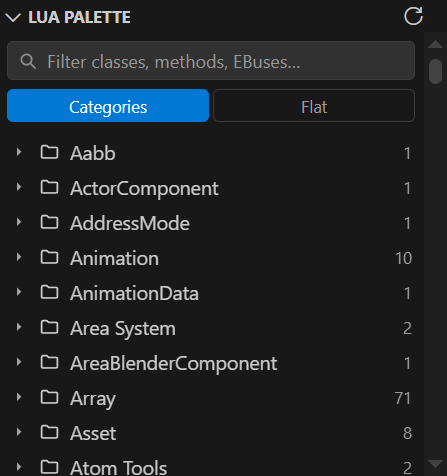
The Lua Palette view in the O3DE activity bar is a searchable browser for the engine’s reflected scripting API, the VS Code counterpart to the Lua IDE’s Class Reference panel.
- Categories groups symbols by Script Canvas category. Flat lists Classes, EBuses, and Globals.
- Filter as you type. Click a symbol to insert a call snippet at the cursor.
- It fills from Generate Lua IntelliSense, and opens beside a script when O3DE hands one over.
IntelliSense
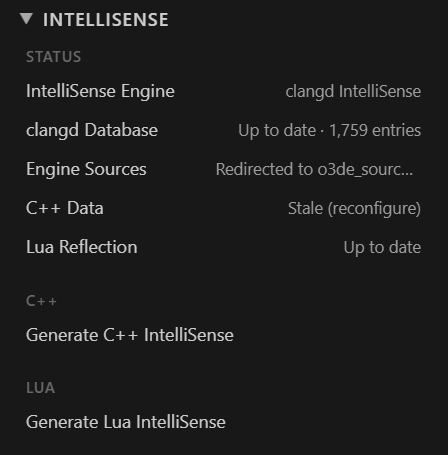
The IntelliSense section covers C++ and Lua together. It’s where to look when code insight seems wrong.
Status
- IntelliSense Engine: which C++ engine is running. C/C++ IntelliSense, clangd IntelliSense, Both running (conflict), or None running. Click to choose. Changes are workspace settings only, and switching back restores what the workspace had.
- clangd Database: shown while clangd uses O3DE’s compile database. Up to date, Update pending, or Not configured. It refreshes itself after a configure, a config switch, a workspace folder change, and at startup.
- Engine Sources: how far C++ navigation reaches into the engine. Indexed (source engine), Redirected to a source engine in your workspace, Headers only (SDK engine), or Not resolved.
- C++ Data: reads Stale (reconfigure) when
CMakeLists.txt, a *.cmake file, or project.json changed since the last configure. - Lua Reflection: reads Stale (gems rebuilt) or Stale (different engine) when Lua completions no longer match your code.
A prebuilt SDK engine ships headers only, so Go to Definition can’t reach engine .cpp files on its own. With a source engine in your workspace, the extension redirects there. In editors that use Open VSX, where Microsoft’s C/C++ extension isn’t published, clangd switches on automatically.
Generate C++ IntelliSense builds c_cpp_properties.json from the CMake File API and registers a live provider, with engine paths resolved to your source engine.
Generate Lua IntelliSense launches the Editor headless, dumps the reflected scripting API, and generates Lua language server stubs. The first run takes a few minutes. After that, .lua scripts get typed completion and hovers for O3DE’s classes, EBuses, and globals. Re-run it after adding gems or changing the reflected API.
Redy to Build?
Get it now!
O3DE Development Tools is an unofficial, community-built extension from Genome Studios.
It isn’t affiliated with, endorsed by, or sponsored by the Open 3D Foundation or the Linux Foundation.